As a biologist, I’ve often thought “I could really use an instrument that did X”. Logging temperatures, locations, depth, light levels and other variables, controlling devices like cameras or servos, and communicating with a computer seem like a task for microcontrollers. So it’s been in my head for a while to try and learn a bit about them.
After putting it off for a while, I thought I would try to find a nice starter kit to experiment with. I looked through a few possibilities before finally deciding, including the:
- MAKE Controller Kit – This one seems pretty handy and powerful.
- Arduino – Open source and cheap.
- Gumstix – More of a computer than a microproccesor. Really cool for powerful applications.
- EasyPIC4 – Tons of features built-in with no soldering necessary. Lots of example programs.
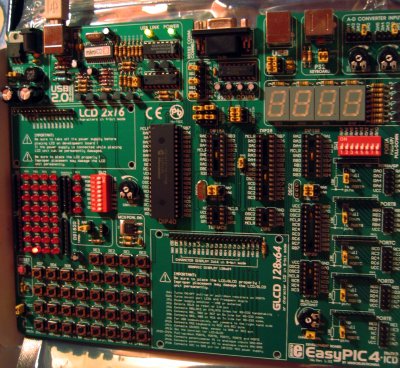
As is evident from the title, I decided to go with the EasyPIC4. This seemed like the most beginner friendly option. I figured it would be nice to be able to learn how to program without worrying that problems were actually caused by some misplaced solder or mistaken understanding of electronics. Conveniently, the EasyPIC4 comes with a 16F877A PIC microcontroller. It cost $119 plus $17 for a graphic LCD and $15 for a character LCD and temperature sensor with a total cost of $152US for enough features to keep me busy learning for quite a while. So I ordered it from mikroElektronika.
I’ve gotten used to almost instant shipping and I was looking forward to trying the thing out so I was a little disappointed when a week passed and I hadn’t heard anything besides the initial confirmation email. But after an email to the mikroElektronika sales, they quickly and nicely got back to me and coincidentally said that my order had been shipped that same day. The shipping is through the Serbian national post so I thought I was out of luck for package tracking but it turns out I could plug the tracking number into Canada’s own post for tracking.
So it finally came but, since I’m cheap and had decided to not order any software along with it, I needed a PIC program compiler. It turns out that mikroElektronica also offers demo versions of their Pascal, Basic, and C compilers for PIC. I went with mikroC since I have a passing familiarity with C++. I think the demo version has a limit in how big a program you can write but I think that it’s large enough for an amateur like me to play around quite a bit without running into.
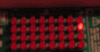
So once I had the right software, I plugged in the EasyPIC4 into my USB port. It immediately started flashing LED’s and displaying a countdown on its numeric display. After having images of the ticking bomb in every Hollywood action movie flash through my head, I realized that mikroElektronika had preloaded the PIC with a demo program. That seemed like a nice touch since I could immediately tell that things were working. So now it was time to try my hand at programming. Luckily the EasyPIC4 comes with a bunch of demo programs. I count 23 sample programs plus a whole bunch in the extra_examples folder that I haven’t even gotten a chance to look at yet. LED_Blinking.c seemed like a good place to start. It took just a few seconds to compile the program and, since mikroC connects easily with the included flash memory loading PICFLASH2 program, load it onto the microcontroller. After seeing the little red LEDs (each labeled with the pin that it connects to) start flashing and looking through the source, I made my own sequence of flashing LEDs within half an hour (sorry about the jerkiness I hadn’t really thought of making an animation out of it until later).
So to wrap up, the EasyPIC4 lived up to its name. Things went easily and well right out of the box. It seems like a really good way for a novice to experiment with microcontrollers. It was really enjoyable to see the tiny computer making real world things happen. I’m looking forward to trying out more of the features.
Bill | 07-Jan-07 at 12:01 am | Permalink
Hello , I bought the easypic4 as well . just a bit slow in getting here, but worth the wait.
I have had great success in using the easypic4. I feel that I finally got something worth while to use as a learning aid for microcontrollers.
enjoyed reading your comment.
Ralph Corderoy | 02-Feb-07 at 12:31 pm | Permalink
Thanks for the review. Helpful for those in a similar boat. — Ralph.
Stephane | 15-Feb-07 at 10:28 am | Permalink
This kit is astounding, especially for the price. It is full of features you won’t even find on other more expensive pic dev kits. Programming it is a breeze and you can immediately see the pins status, thanks to the 36 leds. I bought it with the lcd 16*2 and I started to code a “firmware” for my next project (I started to code the menu system). Buy it, you won’t regret it. An award winning product.
Lee | 05-Apr-07 at 2:09 pm | Permalink
Nice writeup.
Its an interesting of 4 that you narrowed it down to. Of course the unusual one in there is the gumstix as it is really something quite different than the others. Of the other three I’d be interested in hearing how you decided on the EasyPic from the others.
I’d also be interested in hearing more about your intended usage of the product and how you’ve progressed since you first got it.
ScottS-M | 06-Apr-07 at 7:43 pm | Permalink
@Lee
Thanks. I think the deciding factor for me was that the EasyPic came with a bunch of LEDs, switches and LCDs already attached. That meant that I could at least narrow things down to software problems and not some missoldered joint. Also it looks like the extension boards they sell are pretty reasonably priced (e.g. Jameco has 2×16 LCD’s for $12 and the whole ready-to-go EasyPic 2×16 LCD board is $15 and comes with a bonus temperature sensor).
I’ve been a bit busy so I haven’t gotten to mess around with it as much as I’d like but I’ve still been quite happy with it. For example, the other day I was curious about pulse width modulation. It turns out EasyPic4 comes with a PWM example program which had me up and messing around in a few seconds.
To tell the truth, it almost feels too easy sometimes. Not too much sense of accomplishment from getting something working in under a minute. But once/if I get some free time I’m looking forward to picking up some components and trying to put together a few simple projects. I’m sure that’ll be more than difficult enough for me.
Oh and if you’re ordering one make sure to get a EasyConnect board so you can connect other things easily. Seems like a great deal for $5. Wish I would have noticed it when I was ordering.
Gregory | 16-May-07 at 2:28 am | Permalink
I thought it was nice of them to have the 7 segment LED programs in the examples using port B. At least it gives the beginner a sense of accomplishment to change the program to use port D, and see the result on the 7 seg display, for the 16F877.
I am also astounded at the value for money, $165 Australian landed. Incidentally, it only took 7 days to arrive to my door. Also, I am very impressed with their courtesy and follow up. Definitely recommended for professional and amateur alike.
Daniel | 14-Aug-07 at 11:06 pm | Permalink
I am hoping you can answer my question… I have been wanting to learning about microcontrollers and was wonder how “easy” would the EasyPic 4 be to learn with no microcontroller experience and little programing experience? I have thought about purchasing a kit from parallax on learning microcontrollers, but for the price the easypic seems to have way more functionality in the long run. Thanx
ScottS-M | 15-Aug-07 at 12:24 am | Permalink
@Daniel
Well I didn’t have any microcontroller experience and just amateur programming when I picked up the EasyPic4 and I’ve enjoyed it. I haven’t tried any other boards besides the EasyPic so I’m certainly no expert but I really like how the EasyPic comes with so many things (switch, leds, potentiometers, switches, …) built in. On the other hand it would be handy if it had a breadboard once you start messing around with connecting electronic components (although it does run all the pins to headers).
The easyPic was pretty easy to get going. The free demo mikroC compiler is set up very nicely. Just open the program, open some code and hit F11 and the microcontroller gets programmed. The coding isn’t too bad, here’s how to blink an LED (the Hello World of microcontrollers):
void main() {PORTC = 0;
TRISC = 0;
while(1) {
PORTC = ~PORTC;
Delay_ms(1000);
}}
and to display the text “mikroElektronika” on an LCD:
char *text = "mikroElektronika";
void main() {
LCD_Init(&PORTD); // Initialize LCD connected to PORTB
LCD_Cmd(LCD_CLEAR); // Clear display
LCD_Cmd(LCD_CURSOR_OFF); // Turn cursor off
LCD_Out(1,1, text); // Print text to LCD, 2nd row, 1st column
Delay_ms(1000);
LCD_Out(2,6,"mikroE");
}
The coding is easier than I thought but I really haven’t had time to really program anything tough with it (stupid thesis).
Anyway I’m sure you also can’t go wrong with the Basic Stamp since so many people use it. And I’ve seen good things about Arduino although I got the impression it was for slightly more advanced people.
HArdik | 14-Sep-07 at 1:54 pm | Permalink
can u send some program related to 7segment LED,LCD?
ScottS-M | 20-Sep-07 at 2:09 pm | Permalink
@HArdik
Sorry this took a while. I’ve been traveling. The EasyPic4 comes with a bunch of example programs.
Here’s an example out of that file (they have several more examples for the 7 segment display).
Let me know if I didn’t answer your question.
#include "Display_utils.h"unsigned short i;
void main() {
INTCON = 0; // Disable PEIE,INTE,RBIE,T0IE
PORTA = 0;
TRISA = 0;
PORTD = 0;
TRISD = 0;
do {
for (i = 0; i<=9u; i++) {
PORTA = 0;
PORTD = mask(i);
PORTA = 2;
Delay_ms(1000);
}
} while (1); //endless loop
}//~!
vincent hua | 01-Oct-07 at 7:31 pm | Permalink
Try PICAXE. It’s much cheaper and low learning curve.. :)
ScottS-M | 05-Oct-07 at 2:38 am | Permalink
@vincent
Thanks I’ll have to take a look at PICAXE too when I get a chance.
Steven | 02-Nov-08 at 10:54 pm | Permalink
Scott, I want to start using PICS, But I have a question. say you become pretty well-versed @ programming the PIC, and say you have a particular project in mind, for instance an LCD project,would you still use the EPIC4 or go to a smaller more dedicated setup? I would also like to what you ultimately do with it.
ScottS-M | 04-Nov-08 at 11:58 am | Permalink
@Steven
I think you would want to:
1) practice on EasyPic’s builtin LCDs and learn how to work with PICs and LCDs
2) attach the particular model of LCD you plan on using to the output pins of the easypic and try to get that to work
3) program a new PIC with the EasyPic (or another microcontroller programmer) with the program you got working in step 2 and put the PIC into a breadboard with the components you plan on using
4) finally print a circuit board (or just use perfboard) and solder up the final project
So I guess step 1 is where an EasyPIC would be especially useful. Since they have example programs and you know the LCDs are already connected correctly, you know any problems must be software related. If you’re already good with programming microcontrollers and interfacing to LCDs you could probably use any convenient microcontroller setup for steps 2-4. The benefits of the EasyPIC is having all the components connected correctly and allowing you to easily jump into programming without having to worry about whether you soldered a capacitor backwards or connected all the pins of the LCD correctly.