Laptop Repair Guy points out that Toshiba has issued a warranty extension resulting from a class action lawsuit. As far as I can tell (I’m not a lawyer so better check for yourself) I’m out of luck since I’m in Canada but definitely better to have Toshiba fix it for free than try yourself.
After I put up a post about repairing my laptop power connector, Laptop Freak left a informative comment:
As you see on the photo above, the positive connector oxidized and almost black. If you put a fresh solder on the connector like this, the power jack problem will reappear very soon. I usually remove the power jack from the system board (with iron gun and solder sucker), clean oxidized pins on the power jack and pads on the motherboard and only after that resolder the power jack.
It turns out, unsurprisingly, that he was right. The power jack started coming loose again after about a month and a half. I was in the middle of a bunch of things so I didn’t really feel like messing with it so I just opened up the computer and threw some more solder on it. When the power jack started jiggling again a few weeks later, I knew I had to do something better to fix it. So I picked up a desoldering sucker and some desoldering wick.
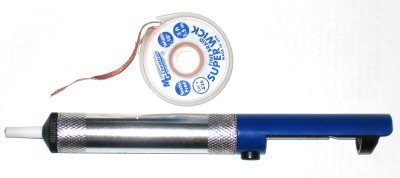
It was kind of fun to melt the solder and suck it up until I started thinking about how much money I was messing with. Anyway I had pretty good luck heating up the solder with the soldering iron, sucking with the sucker (it appears the technical term is desoldering pump), and then getting the remainder with the copper desoldering braid. This left only tiny bit of solder so I pulled on each joint separately while heating them with the soldering iron. MAKE just put up a nice soldering and desoldering video tutorial. Would have been handy to have watched that before doing all this.
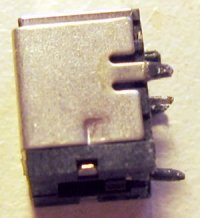
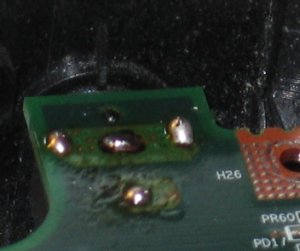
After all that, I was left with the separated power jack. Laptop Freak wasn’t kidding about oxidation. It looks like someone left the connectors in the Dead Sea. I’m no electrician but I’m guessing black crud covering electrical contacts can not be a good thing. So I scraped off all the gunk with a screwdriver and polished them until they were nice and shiny.
Then I tried to clean the contacts on the board with an eraser to remove any oxidation on the copper, stuck the jack back in its holes and soldered it back on. So far I haven’t had any problems, we’ll see if it last this time. If it breaks again (knock on wood), I’m definitely trying the external power jack workaround.
In case you didn’t read my old post about fixing this, here’s links for how to dismantle a Toshiba Satellite A70 (and tons of other laptops) and the common Toshiba power jack problems.
Update:Laptop Repair Guy now has a great step by step guide (complete with many pictures) to repairing the power jack.
Barb | 11-Mar-07 at 3:31 pm | Permalink
Thanx Jim,
I am most positive I have the same problem as you. I appreciate you posting these instructions. I was about to buy a new A/C adapter and or a new battery. This cord wiggling thing was driving me crazy!
Thanx so much, just hope I can get fix this myself.
ScottS-M | 11-Mar-07 at 9:15 pm | Permalink
@Barb
I hope it works for you. Let me know how it goes. If you’re not a good solderer, definitely practice soldering cheap things together first.
Laptop Repair Guy | 26-Apr-07 at 11:12 pm | Permalink
Hi ScottS-M,
I moved my site to a new domain name, here’s a new link for the power jack workaround instructions.
http://www.laptoprepair101.com/laptop/2006/05/27/failed-laptop-power-jack-workaround/
Just in case.
Thank you.
ScottS-M | 26-Apr-07 at 11:40 pm | Permalink
@Laptop Repair Guy
I changed the links. Good luck with the new domain name and thanks for all the great info.
Laptop Repair Guy | 28-Apr-07 at 1:18 am | Permalink
Here’s an update for all Toshiba Satellite M30X, M35X, A70 and A75 notebooks purchased in the United States. Before you take it apart for repair, call you local Toshiba authorized repair center and ask them about warranty extension. Toshiba extended warranty on all above mentioned units and you should get a free repair. Good luck!
ScottS-M | 28-Apr-07 at 9:58 am | Permalink
@Laptop Repair Guy
Thanks for the update. Hopefully that’ll save people some trouble. I think I’m out of luck since I’m in Canada but it does look like some Canadian lawyers are trying too.
John C Seguin | 04-May-07 at 11:45 am | Permalink
Does ANYONE know where I can buy a DC power jack for the blasted Toshiba A70 near Toronto?
Thank you.
ScottS-M | 04-May-07 at 12:27 pm | Permalink
@John
I got lucky and could just clean mine. But it looks like you can get jacks on Ebay (search for “Toshiba A70 power jack”) for less than $10. Or you could look for one of the big electronic catalogs like Digikey and find the appropriate power jack for around $2 (unfortunately I’m not exactly sure which of the many jacks has the correct arrangement of connectors). Make also has a post about Toronto stores.
v | 12-May-07 at 9:16 pm | Permalink
Good thing that there is some smart/thinking people around.
My A70 just developed same “syndrom”
Thanks
v
Anil Kumar | 16-Jul-07 at 1:18 pm | Permalink
So what tool do i need to get this done
(1) obviously tools to open the laptop
(2) ESD wrist flap and esd mat ?? for esd protection (I am not sure)
(3)soldering iron and desoldering pump
(4) magnifying glass to see the circuit break
is there anything else guys.
ScottS-M | 16-Jul-07 at 3:46 pm | Permalink
That sounds about right to me. I got away without static protection (luckily) but I’ve never felt any static where I was working and it certainly seems like a good idea to have some. Some kind of guitar pick-like thing to pry open the top cover might be useful too if I remember correctly. You may need a new power connector too depending on whether the solder or the pin itself broke. Also don’t forget the warranty extension above if you’re in the US. You might be able to get it fixed for free.
Michael | 23-Jul-07 at 12:03 am | Permalink
Dear John C Seguin, laptop repair centre is in the toronto gta just go on the site and see if you find the things you need and good luck. go to http://www.laptoprepaircenter.ca
ScottS-M | 23-Jul-07 at 12:27 am | Permalink
Good suggestion Michael. That URL isn’t working for me though. Did you mean http://laptopcentre.ca? Looks like they’re at:
1485 Eglinton Avenue West
Toronto, Ontario M6E 2G6
JohnP | 23-Sep-07 at 7:47 pm | Permalink
I’m working with the same problem, and going to do the external workaround (except the above site doesn’t work any more). On the jack, there are four pins: one in the middle, one in the middle rear, and two on the sides (extending down from the metal cover). Are the two on the sides ground connections, or are they simply to hold the jack in place? in otherwords, do I need to connect the ground wire to them, or are they pointless if the jack is run outside the body? thanks!
ScottS-M | 23-Sep-07 at 8:09 pm | Permalink
@JohnP
This workaround site wasn’t working for you? It’s working for me now so maybe it was a temporary outage. Anyway the important bit from there seems like:
He’s only got two pins on the terminal he’s using so I’d guess the extra two aren’t necessary although you had better make sure they’re insulated. I guess you already know this but be very careful you don’t invert the polarity. Motherboards don’t like that much at all.
ozmoses | 07-Oct-07 at 5:46 am | Permalink
Static, (ESD) you don’t need to feel the static discharge to do damage to electronics. To feel and hear a static discharge it needs to be a quite high voltage (over 1000 Volts, yes I mean one thousand volts). Discharges in the vicinity of 50 to 75 volts can cause enough damage to degrade components sufficiently to lead to either poor performance or premature failure.
Using antistatic procedures is always worthwhile when working on electronics and should be the first thing you think of when you are working in the internals of ANY computer.
HP (and other computer companies) will dismiss an engineer instantly if they do not follow their static discharge mitigation processes.
ScottS-M | 07-Oct-07 at 9:50 am | Permalink
@ozmoses
Thanks for the advice. I’ll definitely have to be more careful with static in the future.
Saint Pi | 07-Oct-07 at 2:10 pm | Permalink
Having fixed the DCIN jack problem, the laptop does not boot. Lights up and fan swirls. Anyone with a solution to this?
ScottS-M | 08-Oct-07 at 2:57 am | Permalink
@Saint Pi
That doesn’t sound too good. Do you get any boot screen?
omar | 12-Nov-07 at 9:43 am | Permalink
Well i did wat i could with soldering it back in there but i got a problem!! everytime i plug in the power cord in the two fans turn on and no lights turn on at all and the screens off thats wat happens all the time so i don’t know should i unsolder it again and clean it and solder it again or wat do u guys suggest???
ScottS-M | 13-Nov-07 at 4:06 pm | Permalink
@omar
I’m not sure. I never ran into something like that. Maybe someone else reading knows?
raul | 10-May-08 at 3:46 am | Permalink
OK here is some Battery Usage Tips for you
1. A new battery usually comes in a discharged condition and with a very low capacity. It is generally recommended to discharge the TOSHIBA laptop battery first and then charge the battery. Refer to the users’ guide of your electronic device for charging instructions.
2. A new battery pack needs to be circled (fully discharged and recharged) theree to five times to reach its optimum performance.
3. Rechargeable TOSHIBA laptop battery will undergo self-discharging when left unused for a long period of time. Thus, it should always be stored in a fully charged state and kept in a cool, dry and clean place.
4. To maintain the optimum performance of a TOSHIBA laptop battery pack, it is highly recommended to circle(fully discharging and recharging) it at least once a month.
5. It is normal if a new TOSHIBA laptop attery gets warm when being charged or used. However, close attention should be paid if the battery pack becomes excessively hot. This may indicate there is a problem with the charging circuit of the electronic device. So, it is necessary to have it checked by a qualified technician.
6. New TOSHIBA laptop batteries are hard to be charged. Sometimes, your electronic device may indicate a fully charged condition about 10 to 15 minutes when the new battery pack is being charged for the first time. When this happens, remove the battery pack and let it cool down for about 10 to 15 minutes then repeat the charging procedure. Sometimes, a new battery will suddently refuse to be charged. If this happens, it is then suggested to remove the battery from the device and reinsert it.
harry | 04-Jul-08 at 10:51 pm | Permalink
well, Laptop Repair Guy, usually, there is a PCM board inside the battery, which can protect the battery from high volt impacting,or strong Current importing.when this bord is oxidized ,u’d better change the bord for a new one, or change the battery for a new one, since it’s hard to be repair.
here is a site:
http://www.toshiba-laptop-battery.com/toshiba-satellite-a70-seires.htm
hope to help u, good luck!
toshiba | 13-Jul-08 at 10:18 pm | Permalink
OK, What are the reasons that cause battery with no voltage or low voltage?
No voltage.
External shot circuit or overcharge, anti-charge
Cells expansion and short circuit caused by direct anode contact and continuous high efficiency electric current overcharging.
It can be avoided by:
Checking if the battery is without voltage or electric current
Avoiding short circuit
Avoiding collision and pressure among batteries
Charging the battery after it automatically powers off, then full charge the battery.
more information from http://www.toshiba-laptop-battery.com/toshiba-satellite-a70-seires.htm
Steve McB | 12-Jan-09 at 1:27 pm | Permalink
My Toshiba laptop (about 4years old) needs a new battery (won’t hold much of a charge). Problem has been it has turned itself on by itself a few times (AC plugged in). Has ANYONE heard of this problem? Thanks.
jeff | 19-Mar-09 at 2:51 am | Permalink
Looking for tech support on Toshiba A70, pulled battery pack out computer works sparatically, fiddle with the cord constantly when battery pack in to work on battery power, battery will charge when computer is off when turned on AC LIGHT IS ON, Battery charge light goes off, confused on why power is irratic.
rman | 16-May-09 at 12:53 pm | Permalink
Made in China …
These soldering and assembly quality failure is very common in products made in China.
Bob Wewer | 06-Sep-09 at 9:15 pm | Permalink
Thanks for the information. I fried a motherboard a couple of years ago trying to fix the same problem. I have my second Toshiba Satellite P-35 and the AC power was not being recognized and when I shook the wire the battery light would blink. The problem started when I took the machine apart to clean out the dust balls to rectify over heating. The problem started and I figured I shook something loose. The images were helpful because I found that last pin was loose (if you really looked at it while shaking the connector). I did not have to remove the board entirely. I saw the corrosion just like the photo. I heated up the iron and then heated the existing solder, pulling it away with a tiny screwdriver. I tried to lay some flux core 50-50 solder over the pin. I was careful just to add a drop. The solder cooled and when I tried to heat it and to move it to form a wider base, all the old solder came off! I used a toothbrush to clean the board and pin as they were dirty! I then laid just a drop over the pin and worked it into a flared base. It worked!!!!!!!!!!!
jay | 02-Jan-10 at 11:56 pm | Permalink
wow hey i found a solution to the power problem, i took the laptop apart and did the dc jack fix but didnt work… then searched forums all day and found 3-4 people who have fixed this problem like so:
its the earth on the ac jack. just wrap some tin foil around the outside of the jack and then plug it in, bingo!!! fixed toshiba laptop A75, so far its running on AC and charging battery as normal for the first time in over a year! yeehaaaaaaaa!!!
so for sme people the problem isnt the board or dc socket, its the connection from the plug to the socket, the way its designed it doesnt make a good earth connection, there is no tension when u plug it in unless u make it tighter with some tin foil or tin tape would be better, then it would stay on the plug when u unplug it and would not require wrapping it every time u plug it in.
Im amazed I found a solution finally!!! dont have to send it in for repair or take apart laptop again, yaaaaaaaay :] im a happy plopper!
Susi | 22-Jan-10 at 7:03 pm | Permalink
Thx for the informations. its very helpful.
Steve | 05-Feb-10 at 7:29 pm | Permalink
Got an M35x here. Pulled the jack and ran 2 small braided wires to an external jack (external end-of-cord style jack with housing) from Radio Shack, then hot glued the new connector to the back of the laptop. Works a charm on AC! But…
Now when I unplug the AC, it shows it’s still ON ac not charging (battery draining, too). If i power down, the front LED lights stay on as if it IS charging. If I pull the battery and replace it, and everything goes back to normal. Anyone got any ideas as to what, how or why this is happening??
Walter Goode | 05-Mar-10 at 6:57 pm | Permalink
I need a manual on my Toshiba Satellite Computer. Please tell me how to get one. I reside at Hemet, Ca. What is the most convenient way to obtain a manual on this lap top. I cannot find a local store that has a mnual.
Mike | 29-Apr-10 at 1:00 am | Permalink
Great post on how to change a DC Jack. Thanks for your post
Electrician | 24-Jul-10 at 5:11 pm | Permalink
@ Jim “I’m no electrician but I’m guessing black crud covering electrical contacts can not be good…” I am an electrician and I can tell you that it is definitely not good :)
When we do panel installs, code here in the US requires that we use an anti oxidant on the main feeds (or anything with aluminum), I wonder if that would help with this problem.
Satellite TV Guy | 22-Aug-10 at 8:30 pm | Permalink
I had the same problem with my Satellite a70 and gave up. I admit, I purchased a Mac instead.
Don Computer Repair | 23-Aug-10 at 4:01 pm | Permalink
Good information. I have a Toshiba I gave up on because of this same problem. Now I know what I can do to fix it. Thanks
Ben | 09-Sep-10 at 2:07 pm | Permalink
Thanks for the info and the pictures on this Toshiba dc jack repair. Keep up the good work !!
San Marcos computer | 11-Oct-10 at 5:26 pm | Permalink
Great repair tutorial, but only for experienced techs! I think i have to stay away from toshiba pcs for now
usedlaptopclub | 16-Nov-10 at 8:18 am | Permalink
I am experiencing the same problem with my portable toshiba a70 computer.
When i try to plug in my power outlet to charge my batterie, the light that usually indicates that the computer iis charging doesn’t turn on. The only way to charge it is to play with the power cord for about half an hour until the light finally lights up.
I was wondering what would be the best solution to this problem.
Electrician | 19-Nov-10 at 12:38 am | Permalink
I’ve had some problems in the past with my RCA TV and one of my old laptops but if I ever bought anything Toshiba…- it lasted!! Toshiba is a great brand – you can’t deny that!
Anna Computer Repair | 18-Dec-10 at 12:43 pm | Permalink
Lol thanks for the info. I hate to say this but after doing a litle do it yourself research, when I need something soldered now, I just give it to my dad…!
Anaheim Electricians | 02-Apr-11 at 9:53 am | Permalink
Same problem with mine. Any updates guys? i haven’t tried the foil set up yet. I have doubts about it.
Northville Computer | 03-Apr-11 at 1:01 pm | Permalink
I had purchased a new laptop of Toshiba Company, but I’m not aware of this kind of problems. Tell me What I’ve to do to get rid of this kind of problems.
Northville
engineering leveling | 01-May-11 at 9:36 pm | Permalink
Not to be a downer but, I think that this is a incredible difficult fix. If it was me, I would bought a new one
Stephan | 18-May-11 at 1:18 am | Permalink
I have Toshiba laptop too but I never experience this kind of problem. Toshiba laptops are good to use because of its high quality.
small notebook compu | 20-May-11 at 4:22 am | Permalink
Toshiba is no doubt about its quality, especially with the repair facility, this would increase user trust toshiba.
When we do panel installs, code here in the US requires that we use an anti oxidant on the main feeds (or anything with aluminum), I wonder if that would help with this problem.
computer repair dc | 21-May-11 at 6:25 am | Permalink
I have also Toshiba laptop and i am using it for 1 year and I have no problem in my laptop in one year. it is really best to use.
pubudu | 16-Jan-12 at 5:06 am | Permalink
Since 2 months ago, my Toshiba Equium A200 suddenly freezes when AC power is plugged-in. When the laptop is in battery mode (meaning the AC power is unplugged), the laptop works fine and there are no problems within it. However, as Engineering student, I can’t just work for few hours and recharge again the battery. I always work with my laptop for more than 3 straight hours. The lifespan of my battery is only 1 – 1.5 hours. To be more precise, sometimes my laptop won’t boot at all when connected to an AC power. So what I did is to put the laptop in battery mode first and when it reached windows, I then connect the AC power. However, after few seconds, the laptop freezes and I cannot move the mouse anymore and I’ll end up unsafely turning off my laptop.
sam | 18-Feb-12 at 1:22 am | Permalink
Hi, my Satellite A70 doesn’t power on. When I plug in the the adaptor, the green battery light blinks for a second, but doesn’t want to stay on. Can’t turn it on no matter what. When I unplug the power cord and hit the power button, the same light blinks for a second, but nothing happens. I jiggled the power jack, but nothing blinks, seems to be sturdy. Only when I plug the cord or hit the power button (when unplugged) I get green light for a split second. I took it apart and it looks sturdy next to power jack. Any suggestions or tips would be greatly appreciated, hate to see it go in the trash. Thanks.
Ardham Kelly | 09-Apr-12 at 10:36 am | Permalink
I was just about to buy this (second hand) but I’m so glad I read about this on time! Thanks alot.