Bash/UNIX

Syntax highlighting in terminal

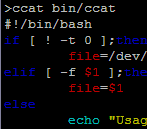
Syntax highlighted cat I was just quickly flipping through code on a terminal and got to thinking that it would be pretty handy to be able to syntax highlight when using head or grep without having to open an editor. Luckily, I remembered Pygmentize was pretty handy when syntax highlighting in LaTeX so I wondered if they had an equivalent output for terminal. It turns out they do (in standard or 256 color no less) so in a couple minutes I had a really short script for highlighting code at the terminal saved it to bin/ccat and was ready to go. Pygmentize really is impressive. Here’s the script if anyone else is looking to do the same: [bash] #!/bin/bash if [ ! -t 0 ];then file=/dev/stdin elif [ -f $1 ];then file=$1 else echo “Usage: $0 code.c” echo “or e.g. head code.c|$0” exit 1 fi pygmentize -f terminal -g $file [/bash] It just looks for stdin and if it doesn’t find it it looks for a file name or takes direct input. Obviously it requires Pygmentize (which is really easy to install if you already have Python).

Bash/UNIX
Programmer

Comments (7)

Permalink

Tab Indented Standard Input Redirect in Bash

I managed to forget how to redirect standard input (when you want to feed a bunch of lines to a program) in a bash script while still indenting and had to go digging around for it. So I figured I’d make a note here so I don’t forget again and for anyone else in the same boat. It’s just <<- instead of <<. For example if you want to keep indentation within a loop:

[bash] for i in 1 2 3 4;do catYou can use whatever you want to indicate the end of the input instead of EOF if it floats your boat (as long as you use the same thing both times) but unfortunately <<- doesn’t work with spaces for indentation (although I’m a tab man myself).

Bash/UNIX
Programmer

Comments (2)

Permalink

Counting Q20 Bases in a .qual File

I sometimes get asked to count the number of bases with qualities greater than or equal to 20 in a quality file. I’m not entirely sure this is all that good a metric with 454 sequencing but that’s another story. It always takes me a minute or two to come up with the right Unix commands to do it so I’m going to post it here so I remember (and maybe save someone else a couple minutes).

cat *qual|grep '^[^>]'|sed 's/ /\n/g'|grep -c [234][0-9]

This is very quick and dirty (just removing lines starting with “>”, replacing spaces with newlines and counting the resulting lines with quals 20-40) but it seems to work ok for me. Also yes I know it’s stupid to cat to a grep but I often replace the cat with head for testing. And I’m sure you could do it in a single awk or sed step but it gets done in a minute or two for several hundred million bases so I haven’t really been motivated to change it.

Bash/UNIX
Bioinformatics
Biologist
Programmer

Comments (1)

Permalink

Don’t Use Zypper to Upgrade OpenSuse

OpenSuse gecko

I installed OpenSuse on my work computer and I’ve been really happy with it so far. Recently, OpenSuse came out with a new version 11.1 so I figured I would upgrade. Since this was my first time updating, I turned to google and the first result for “upgrade opensuse 11.1” is this page about zypper on the OpenSuse site. It sure sounds easy, just run zypper and OpenSuse will upgrade in the background.

But after 5 hours of installation fun (Want me to fall back to /dev/mapper/...?) I just wanted to warn people that this is not the way to go. Somehow zypper decided that my computer would function just fine without supporting the harddrive (RAID0) but I was forced to disagree with this point when my computer became unbootable. Luckily the installation DVD (after finally downloading) was able to fix the problem.

So if you’re planning on upgrading your OpenSuse, I would say it’s definitely worth just downloading the DVD and updating from that (which actually went really smoothly).

Yes I do (now) realize the zypper upgrade page says:

This method is unsupported. The official method of upgrading to a new release is by using the latest DVD. To start the upgrade you boot from the DVD and start installation, at some point you will be prompted to either do a New Installation or Upgrade, at that point you select Upgrade and continue with the setup.

But I didn’t realize that translated to really really don’t use this method. Anyway live and learn and now I know it’s really easy to upgrade from the DVD.

Bash/UNIX
Programmer

Comments (5)

Permalink

Converting .eps to .png Easily

I end up generating a lot of postscript plots in R and other programs. Unfortunately, a lot of not so technical people have trouble opening postscript files so I end up having to convert these images to other formats pretty often. A really handy program for converting eps files to png (or jpg although that’s not really an optimal format for plots) is ImageMagick (available for all OSs I believe). ImageMagick lets you quickly convert (and create thumbnails, make B&W,…) from the command line without having to open up Photoshop.

For example, to convert an image named myPlot.eps to png you just need to enter convert myPlot.eps myPlot.png (convert is a program in the ImageMagick package) at the command prompt and you’ll get a png file in myPlot.png. If you want to adjust the resolution (the default resolution is 72 dpi) of the output image, you can add the -density option (e.g. for 200 dpi convert -density 200 myPlot.eps myPlot.png). Make sure you put the -density part before the input image name.

Converting many files at once is where ImageMagick really shines. The mogrify command is probably the quickest option. For example, to convert the files image01.eps, image02.eps and image03.eps to png, just use the command mogrify -format png image*.eps. In one shot, it will create image01.png, image02.png and image03.png.

Unfortunately, recent version of Imagemagick seem to be treating eps to png conversions oddly (see below) so mogrify isn’t cutting it on my files. If you have similar trouble (and you’re on Unix or Mac or Cygwin), you can just use a bit of Bash combined with the convert command to get around the problem like this:

[bash] for f in `ls *.eps`; do convert -density 100 $f -flatten ${f%.*}.png; done [/bash]

Black Background Problem

As I mentioned above, I started having trouble converting from eps to png after upgrading to ImageMagick 6.4. The transparent/white backgrounds in my eps files were being converted to black backgrounds and making the figures unreadable. I guess it must be some change in how transparency is handled but I’m not totally sure what changed. It took me a bit of googling before I found the solution, so I’ll repost it here. Adding -flatten to the command (e.g. convert myImage.eps -flatten myImage.png) should change the background back to white. My mogrify command doesn’t include the -flatten option so convert (like the example above) seems like the way to go.
Bash/UNIX
Programmer

Comments (17)

Permalink